Introduction to how to build a retaining wall with blocks
Are you looking to add some style and functionality to your outdoor space? Building a retaining wall with blocks may be just the project you need. Not only can a well-built retaining wall enhance the aesthetics of your landscape, but it also serves an important purpose in preventing soil erosion and creating usable terraced areas.
But where do you start? With so many options available, choosing the right materials and following proper construction techniques can seem overwhelming. Don’t worry though; we’ve got you covered! In this article, we’ll guide you step-by-step on how to build a retaining wall with blocks that are not only structurally sound but also visually appealing.
Choosing the right wall material for your project
Choosing the right wall material is crucial when embarking on a retaining wall project. The material you choose will not only impact the overall aesthetics of your space but also determine the durability and longevity of the structure. There are several options to consider, but one popular choice among homeowners and professionals alike is using blocks for building retaining walls.
Blocks offer a versatile solution that can withstand high loads while providing an attractive finish. Concrete blocks, in particular, are known for their strength and stability, making them ideal for holding back soil and preventing erosion. They come in various shapes, sizes, and colors, allowing you to customize your design according to your preferences.
Before settling on a specific type of block, it’s important to assess factors such as budget constraints, site conditions, and intended use. For example, if you’re looking for a more economical option or have limited space available, interlocking concrete blocks may be suitable. On the other hand, natural stone or brick blocks might be chosen for their aesthetic appeal in upscale landscapes.
Consulting with professionals or visiting local suppliers can provide valuable insights into which materials work best given your unique circumstances. Additionally,” DIY guides online offer detailed information about different types of block materials along with installation tips—these resources can help make an informed decision based on expert recommendations.
In summary,” choosing the right wall material sets the foundation for a successful retaining wall project.” By carefully considering factors like budget,” site conditions,” intended use”,” and seeking guidance from experts”, you’ll ensure that your new structure stands strong while adding beauty to your outdoor space.”.
Checking with local authorities and obtaining necessary permits
When it comes to building a retaining wall with blocks, there are important steps you need to take before getting started. One crucial step is checking with local authorities and obtaining the necessary permits. This may seem like a hassle, but trust me, it’s worth it in the long run.
Before you begin any construction project on your property, it’s essential to consult with your local authorities and obtain the required permits. These regulations exist for several reasons: they ensure that the wall meets safety standards, prevent potential damage or accidents from occurring, and maintain consistency within the community.
To start this process, reach out to your local building department or planning office. They will provide information about specific requirements for retaining walls in your area. Depending on where you live, you may need to submit plans or drawings of your proposed wall design for approval.
By taking the time to check with local authorities and obtain necessary permits beforehand, you can avoid costly fines and complications down the road. Plus, knowing that your project meets all legal requirements will give you peace of mind as you proceed with constructing your retaining wall.
Remember: It’s always better to be safe than sorry when it comes to following regulations and obtaining permits for building projects—no matter how big or small.
Preparing the site and creating a solid foundation
Preparing the site and creating a solid foundation is a crucial step in building a retaining wall with blocks. Before you start, make sure to clear the area of any vegetation or debris. This will help ensure a clean and stable work surface.
Next, it’s important to excavate the site to create a level base for your wall. Use a shovel or an excavator to remove any soil or rocks that may be in the way. Take care not to disturb neighboring structures or utilities during this process.
Once you have cleared the area, it’s time to create a solid foundation for your wall. Start by digging trenches along the length of where your wall will be placed. These trenches should be about twice as wide as your blocks and deep enough to accommodate at least one layer of compacted gravel.
After digging the trenches, fill them with compacted gravel up until ground level. Use a tamper or plate compactor to firmly pack down the gravel and ensure stability. This will provide a sturdy base for your retaining wall.
By properly preparing the site and creating a solid foundation, you are setting yourself up for success when building your retaining wall with blocks! Taking these steps early on will contribute greatly to its overall strength and durability over time without compromising safety.
Ensuring the surface is level for proper block placement
Ensuring the surface is level for proper block placement is crucial when building a retaining wall with blocks. A level foundation provides stability and ensures that the wall will stand strong against pressure from soil and water.
To begin, you’ll need to clear the site of any vegetation or debris. This will give you a clean slate to work with. Next, use a shovel or excavator to remove any topsoil and create a flat surface for the base of your wall.
Once the area is cleared, it’s time to check for levelness. Use a long straightedge, like a piece of lumber or metal pipe, and place it across different sections of the site. If there are any high spots, remove some soil until everything is even.
Now that you have a level surface, mark out where your first row of blocks will be placed. It’s important to double-check this measurement before proceeding further. You can use stakes and string lines as guides to ensure accuracy.
With your marked-out area ready, start placing your first row of blocks according to your design plan. As you lay each block down, make sure it sits flush and level with its neighboring block. Adjust if necessary by adding or removing some soil underneath.
By taking these steps in ensuring a leveled surface for proper block placement, you’re setting yourself up for success in building your retaining wall with blocks. Keep reading for more helpful tips on creating an impressive structure that will withstand the test of time.
Stacking blocks with a slight backward slope for stability
Stacking blocks with a slight backward slope for stability is an important step in building a retaining wall that will stand the test of time. When it comes to constructing a sturdy and reliable structure, proper positioning of each block is key. By tilting the blocks slightly backward as you stack them, you create a stronger bond between the blocks and enhance their stability.
To achieve this backward slope, start by placing the first row of blocks on your prepared foundation. Make sure they are level and firmly secured before moving on to the next row. As you add more rows, gradually tilt each block back towards the hillside or are being retained.
This slight backward slope helps counteract any pressure applied by soil or water against the wall. It prevents excessive leaning or bulging that could compromise its integrity over time. Additionally, this technique improves drainage by allowing water to flow away from the base of the wall instead of pooling behind it.
For optimum stability, ensure that each block fits snugly against its neighbor and leaves no gaps between them. Use a level at regular intervals to check for any deviations from plumpness or straightness. Adjust as necessary while maintaining that crucial backward lean.
By stacking your blocks with a slight backward slope for stability, you can rest assured knowing that your retaining wall will remain strong and durable even in challenging conditions. So take your time during this step and pay attention to detail – it will be worth it in the long run.
Allowing for proper drainage in the design
When it comes to building a retaining wall with blocks, ensuring proper drainage is essential for its long-term stability. Without proper drainage, water can build up behind the wall and cause pressure that may lead to failure. So, how do you allow for proper drainage in your design?
It’s important to consider installing a perforated pipe at the base of the wall. This pipe will help collect any excess water and redirect it away from the wall structure. Be sure to connect this pipe to an appropriate drain or outlet system.
Incorporating gravel into the backfill material can also aid in drainage. The gravel allows water to flow more freely through the soil instead of accumulating behind the wall.
Additionally, creating weep holes along the base of the retaining wall can further promote drainage. These small openings allow any trapped water behind the wall to escape gradually over time.
Considering Adding a layer of landscape fabric between your backfill and soil can prevent clogging from fine particles while still allowing for adequate water flow.
Remember, proper drainage is crucial for maintaining the integrity of your retaining wall with blocks. By implementing these measures into your design, you’ll ensure that excess moisture doesn’t become a threat.
Backfilling correctly to support the wall structure
Now that you have successfully stacked your blocks and created a sturdy retaining wall, it’s time to focus on backfilling. This crucial step ensures that the structure remains stable and can withstand pressure from behind.
Start by adding a layer of gravel or crushed stone at the base of the wall. This will provide drainage for any water that may accumulate behind the wall. Make sure to compact this layer well using a plate compactor or by tamping it down with a hand tamper.
Next, continue filling in with soil, making sure to use clean fill material free from debris or organic matter. Layer by layer, compact each section thoroughly before moving on to the next one. This will help prevent settling over time and maintain the integrity of your retaining wall. As you backfill, pay attention to any voids or gaps that may form between the blocks. Use additional soil or small stones to fill these spaces tightly, ensuring there are no empty areas within your wall.
Remember to slope the soil away from both sides of the retaining wall at an angle of 2-3%. This promotes proper drainage and prevents excess moisture buildup against your structure. By following these steps and taking care during backfilling, you’ll create a strong foundation for your retaining wall that will stand tall for years to come.
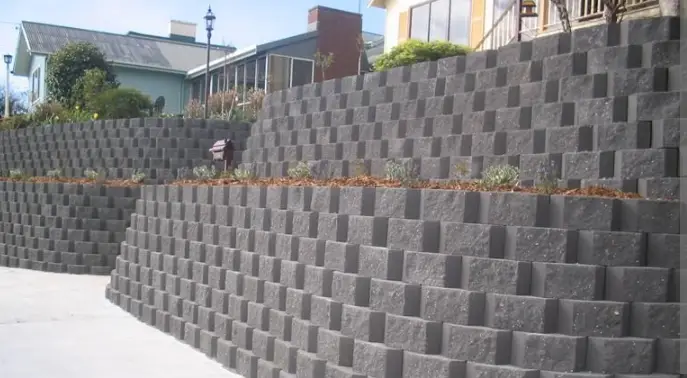
Considering multiple tiered walls instead of one tall wall
When it comes to building a retaining wall with blocks, one important factor to consider is whether to opt for a single-tall wall or multiple-tiered walls. This decision can have a significant impact on the overall stability and functionality of your retaining wall.
One advantage of using multiple-tiered walls is improved structural integrity. By dividing the height into smaller sections, each tier can better withstand the pressure exerted by the soil behind it. This reduces the risk of collapse and ensures long-term durability. In addition to enhanced stability, multiple tiers also offer aesthetic benefits. Breaking up the height with staggered levels creates visual interest and adds dimension to your landscape design. You can even incorporate plants or decorative elements between each tier for added beauty.
Furthermore, constructing multiple-tiered walls allows for more flexibility in landscaping. Each level provides an opportunity for different plantings or landscaping features, creating distinct areas within your outdoor space. Building multiple tiers may be more cost-effective than constructing one tall wall. The materials required are typically less extensive since you won’t need as many blocks or additional reinforcements like geogrids.
By considering these factors and weighing them against your specific needs and preferences, you can make an informed decision about whether to build a single-tall wall or opt for multiple-tiered walls when creating your retaining structure with blocks.
Building a mortar-free wall with interlocking blocks
When it comes to building a retaining wall with blocks, one popular option is to construct a mortar-free wall using interlocking blocks. This method not only saves time and effort but also offers flexibility in design and future maintenance.
To begin, make sure you have chosen the right interlocking blocks for your project. There are various types available, each with its own unique characteristics and aesthetic appeal. Take into consideration factors such as block size, shape, texture, and color to achieve the desired look for your retaining wall.
Once you have selected the blocks, it’s important to prepare the site properly before starting construction. Clear away any vegetation or debris from the area where the wall will be built. Level out the ground and create a solid foundation by compacting soil or adding a layer of gravel.
Now it’s time to start stacking! Interlocking blocks are designed in such a way that they fit together tightly without requiring mortar or adhesive. Begin at one end of the wall and work your way across, making sure each block is securely locked into place with its neighboring ones.
By following these steps carefully, you can build a sturdy mortar-free retaining wall that will withstand erosion over time while providing an attractive addition to your outdoor space.
Finishing touches: placing capstones or special caps
When it comes to adding the finishing touches to your retaining wall, placing capstones or special caps is an essential step. Not only do these components provide a polished look, but they also help to add stability and functionality to your structure.
Capstones are available in a range of materials, including natural stone, concrete, and brick, allowing you to choose the option that best matches your aesthetic preferences. These flat stones or blocks are typically placed on top of the final row of blocks, creating a smooth surface that completes the appearance of your retaining wall.
Special caps may be used instead of capstones for certain block systems. These caps are designed specifically for interlocking block walls and can be easily attached using adhesive or mortar. They provide a seamless transition between each individual block while offering additional protection against weathering and erosion.
To ensure the proper installation of capstones or special caps, it’s important to follow manufacturer guidelines. This includes applying adhesive or mortar evenly along the top row of blocks before carefully placing each piece into position. Take the time to double-check alignment and make any necessary adjustments before allowing the adhesive or mortar to dry completely.
Remember that safety should always come first during this process. Use caution when handling heavy stones or blocks and consider enlisting the help of others if needed. With attention to detail and careful placement, you can achieve a stunning finished result with capstones or special caps on your retaining wall.
Tips and recommendations from experts in the industry
Building a retaining wall with blocks can be a challenging but rewarding project. To help you achieve success, we reached out to experts in the industry who shared their top tips and recommendations:
- Plan ahead: Before starting your project, take the time to carefully plan every step. Consider factors such as soil type, water drainage, and the purpose of your wall.
- Use quality materials: Invest in high-quality blocks that are specifically designed for retaining walls. They will offer better durability and stability over time.
- Compact the soil: Ensure that the ground is properly compacted before laying any foundation or placing blocks. This will create a solid base for your wall.
- Follow manufacturer guidelines: Each brand of block may have specific instructions for installation and spacing requirements. Be sure to read and follow these guidelines closely.
- Consider reinforcement options: Depending on the height of your wall, it may be necessary to include reinforcement such as geogrids or steel bars within the structure for added stability.
- Seek professional advice if needed: If you’re uncertain about any aspects of building a retaining wall with blocks, don’t hesitate to consult with a professional engineer or contractor who specializes in this type of construction.
- Maintain proper drainage: Incorporate drain pipes or gravel backfill behind your wall to ensure adequate water drainage and prevent excess pressure buildup behind the structure.
- Be mindful of aesthetics: While functionality is crucial for retaining walls, consider incorporating design elements like capstones or special caps that enhance their appearance while providing additional strength at vulnerable points.
- Remember, building a retaining wall requires careful planning, attention to detail, and adherence to local regulations regarding permits and codes.
By following these tips from industry experts along each step of this process, you’ll be well on your way toward constructing a sturdy and visually appealing retaining wall that stands strong for years to come.
FAQS on how to build a retaining wall with blocks
As you embark on your journey to build a retaining wall with blocks, it’s natural to have some questions. To wrap up this guide, let’s address some commonly asked questions and provide you with the answers you need.
Do I need any special tools or equipment to build a retaining wall with blocks?
While basic hand tools like shovels, levels, and mallets are essential, specific equipment requirements may vary based on the complexity of your project. It’s always a good idea to consult with experts or professionals who can guide you in selecting the right tools for your needs.
How long does it take to build a retaining wall with blocks?
The time required depends on various factors such as the size of the wall, site preparation, and experience level. It could take anywhere from several days to weeks for larger projects. Planning ahead and allocating sufficient time is crucial for ensuring quality results.
Are interlocking block walls as sturdy as mortared walls?
Yes! Interlocking block systems offer excellent stability when properly installed according to manufacturer instructions. They eliminate the need for mortar while maintaining durability through their unique design that allows each block to lock into place securely.
Can I build a retaining wall without obtaining permits?
In most cases, especially for higher walls or those located close to property lines or roadsides, obtaining permits from local authorities is necessary. Compliance ensures safety standards are met and prevents potential legal issues down the line.
What maintenance does a retaining wall require after construction?
Regular inspection of your retaining wall is recommended throughout its lifespan. Look out for any signs of damage or shifting that may indicate underlying issues requiring attention. Additionally, clearing debris from drains regularly helps maintain proper drainage functionality.
Remember that building any structure requires careful consideration of engineering principles and adherence to safety guidelines specific to your location. When in doubt, consulting with professionals or seeking expert advice will ensure that your project is done right.
