Are you looking for an eco-friendly and affordable alternative to traditional building materials? Look no further, because compressed earth blocks might just be the solution you’ve been searching for. In this article, we will guide you on how to make compressed earth blocks yourself step by step. These versatile blocks offer numerous benefits such as sustainability, affordability, and durability. Whether you’re planning to build a small garden shed or a full-scale home, learning how to make compressed earth blocks can be a game-changer in your construction endeavors. So let’s get started on this exciting journey of creating sustainable structures that Mother Nature would approve of.
What are compressed earth blocks?
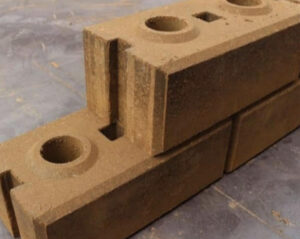
Compressed earth blocks, also known as CEBs, are building blocks made from a mixture of soil, cement (or stabilizer), and water. These blocks are created by compressing the mixture in a hydraulic press or manually using a block-making machine. The result is a solid and sturdy construction material that can be used for various purposes.
One of the key benefits of compressed earth blocks is their sustainability. By utilizing local soil resources, these blocks minimize the need for excessive transportation and reduce carbon emissions associated with traditional building materials like bricks or concrete. This makes them an eco-friendly choice for environmentally conscious builders.
In addition to being sustainable, compressed earth blocks offer excellent thermal insulation properties. Due to their composition, they have better heat retention capabilities compared to conventional materials. This means that buildings constructed with CEBs require less energy for heating and cooling, resulting in lower utility bills and reduced environmental impact.
Another advantage of using compressed earth blocks is their affordability. With minimal raw material costs involved – mainly soil and cement – these blocks provide an inexpensive alternative to expensive construction materials without compromising on quality or durability. This makes them accessible to individuals or communities with limited financial resources who still aspire to build safe and comfortable homes.
Moreover, compressed earth blocks possess remarkable strength and durability when properly made and cured. They have been used in various countries around the world for centuries due to their ability to withstand natural elements such as earthquakes, hurricanes, or extreme temperatures.
Compressed earth blocks offer a sustainable, cost-effective solution for construction projects while providing excellent thermal insulation properties and long-lasting durability. Whether you’re considering building your dream home or embarking on a community development project, learning how to make compressed earth blocks opens up endless possibilities for creating environmentally friendly structures that stand the test of time.
Benefits of using compressed earth blocks
Compressed earth blocks (CEBs) offer a multitude of benefits that make them an attractive choice for construction projects. Here are some key advantages:
- Sustainability: CEBs are made from locally sourced soil, reducing the need for transportation and minimizing carbon emissions. They also require minimal energy during manufacturing compared to traditional building materials.
- Cost-effective: With CEBs, you can significantly reduce construction costs as the raw materials are readily available and inexpensive. Additionally, their thermal properties help in maintaining a comfortable indoor temperature, reducing energy consumption and utility bills.
- Durability: CEBs have excellent load-bearing capacity and can withstand seismic forces better than conventional bricks or concrete blocks. Their strength comes from compacting the mixture tightly before drying, resulting in sturdy structures that last for decades.
- Versatility: These blocks can be easily customized by adding stabilizers like cement or lime to enhance their strength or improve resistance against moisture penetration.
- Thermal insulation: The high thermal mass of CEB walls helps regulate internal temperatures by absorbing heat during the day and releasing it at night, thus reducing reliance on heating and cooling systems.
- Environmental friendliness: By using CEBs instead of traditional building materials like wood or concrete, you contribute to preserving forests while minimizing environmental damage caused by resource extraction processes associated with those materials.
Utilizing compressed earth blocks offers numerous advantages such as sustainability, cost-effectiveness, durability, versatility, thermal insulation properties, and environmental friendliness – making it a compelling choice for eco-conscious builders aiming to create sustainable structures without compromising on quality or aesthetics.
Materials and Tools Needed for Making Compressed Earth Blocks
To make compressed earth blocks, you will need a few essential materials and tools. Here is a breakdown of what you will need:
- Soil: The primary material for making compressed earth blocks is soil. It is important to choose the right type of soil that has the right composition and clay content. Generally, sandy or loamy soils with around 20-30% clay are ideal.
- Cement: Adding cement to the soil helps strengthen the blocks and improve their durability. The amount of cement needed depends on various factors such as soil composition and block size.
- Water: Water is essential for binding the mixture together. You will need enough water to achieve proper moisture content in your soil-cement mixture.
- Block Press/Compressor: A block press or compressor machine is used to compress the mixture into solid blocks with uniform shape and density.
- Mold/Frame: A mold or frame made from wood or metal is used to shape the blocks during compression.
- Shovel/Trowel: These tools are necessary for mixing the soil, cement, and water thoroughly before compression.
- Wheelbarrow/Bucket: You will need a wheelbarrow or bucket to transport your mixed soil-cement mixture from one place to another easily.
- Curing Space: After shaping the blocks, they need time to dry and cure properly before use. Therefore, you will require an area where these blocks can be laid out for curing without being disturbed by external factors like rain or excessive sunlight.
Remember that specific requirements may vary depending on different techniques used in making compressed earth blocks but having these basic materials and tools should be sufficient to get started.
Step-by-Step Guide on how to make compressed earth blocks
This step-by-step guide provides just an overview of making compressed earth blocks. It’s crucial to conduct thorough research and consult experts or experienced individuals in order to achieve optimal results in your specific context.
A. Preparing the Soil
Before you can start making compressed earth blocks, it’s important to prepare the soil properly. The quality and composition of the soil will directly impact the durability and strength of your blocks.
- To begin, you’ll need to find a suitable source of soil. Look for well-drained soil that is free from organic matter such as roots or debris. Sandy or loamy soils are ideal for making compressed earth blocks.
- Once you have collected the soil, break up any clumps and remove larger rocks or stones. It’s also a good idea to sieve the soil to ensure a consistent texture throughout.
- Next, moisten the soil slightly with water. This will make it easier to mix and compact later on. Be careful not to add too much water as this can lead to weak blocks that may crumble over time.
- Now it’s time to test your prepared soil by taking a handful and squeezing it tightly in your palm. If it holds its shape without crumbling apart, then you have achieved an optimal moisture content for block-making.
Preparing the soil is a crucial step in creating high-quality compressed earth blocks that are durable and long-lasting. Take your time with this process as it lays the foundation for successful block production.
B. Mixing the Soil with Cement and Water
Mixing the soil with cement and water is a crucial step in making compressed earth blocks. This process ensures that the blocks have the necessary strength and stability to withstand different weather conditions.
- To begin, gather your materials: a shovel, a mixing container, cement, water, and of course, the soil. The soil should be free from debris like rocks or roots.
- Start by measuring out the amount of soil you’ll need for your desired number of blocks. It’s important to get this ratio right as it will greatly affect the quality of your blocks. Generally, a mixture of 5-10% cement per volume of soil is recommended.
- Once you have measured out your soil and cement, mix them together thoroughly using the shovel or preferably with a mechanical mixer if available. Ensure that both ingredients are evenly distributed throughout the mixture.
- Next comes adding water gradually while continuing to mix. Be cautious not to add too much water as it can make the mixture too wet and weaken its structural integrity. Aim for a moist but not saturated consistency.
- Continue mixing until all components are well blended and form a homogeneous paste-like material without any dry spots or clumps of cement.
- You now have successfully mixed your soil with cement and water to create an ideal blend for compressed earth block production.
Remember that practice makes perfect when it comes to getting this step just right. Experiment with different ratios and techniques until you achieve an optimal mixture for producing strong and durable compressed earth blocks.
C. Shaping the Blocks
Once you have mixed the soil with cement and water, it’s time to shape the blocks! This step is crucial in creating compressed earth blocks that are uniform in size and shape.
- First, you’ll need a block molding machine. There are various types available, so choose one that suits your needs and budget. The machine will help you achieve consistent results by applying pressure to compact the mixture into solid blocks.
- Next, prepare the mold by lubricating it with oil or using a release agent. This will prevent the mixture from sticking to the mold and make it easier to remove the blocks later on.
- Now, take a portion of the soil-cement mixture and place it into the mold. Use a tamper or manual press to compress the material firmly into all corners of the mold. Repeat this process until each cavity is filled with compacted soil-cement mix.
- After shaping each block, carefully remove them from the molds and set them aside for drying and curing. It’s important not to stack them immediately as they can lose their shape during this stage.
Remember that precision is key when shaping compressed earth blocks. Take your time to ensure each block is properly formed before moving on to drying and curing them.
D. Drying and Curing the Blocks
Once you have shaped the compressed earth blocks, it’s time to dry and cure them properly so they can gain strength and durability. This step is crucial in ensuring the structural integrity of your construction.
- To begin, carefully transfer the freshly molded blocks to a well-ventilated area where they can air-dry naturally. It’s important to protect them from direct sunlight or heavy rain during this process.
- Allowing sufficient drying time is essential. Depending on weather conditions, it may take several weeks for the blocks to completely dry out. Regularly check their moisture levels by touching them; if they feel cool or damp, additional drying time is needed.
- Proper curing is equally important as drying. After the blocks are fully dried, move them into a covered area where they can continue curing for at least 14 days. This allows for chemical reactions between cement and soil particles, enhancing block strength.
- During curing, it’s crucial to keep the blocks moist by spraying water on them regularly. This helps prevent cracking while allowing further integration of materials within each block.
Remember that patience is key during this stage. Rushing through drying or curing could compromise the quality of your compressed earth blocks. Following these steps ensures that your compressed earth blocks will be strong and ready for construction applications such as building walls or even entire houses.
Common Challenges and Solutions on how to make compressed earth blocks
- Soil Composition: One common challenge when making compressed earth blocks is finding the right soil composition. It’s crucial to have clay-rich soil with a good amount of sand and silt. If your soil lacks clay, you can add some by sourcing it from another location or purchasing it.
- Moisture Content: Another challenge is achieving the correct moisture content in the soil mixture. Too much water can lead to weak blocks that may crumble, while insufficient moisture makes it difficult for the mixture to bind together properly. The solution is to gradually add water while mixing until you reach a consistency where the soil holds its shape without being too wet.
- Block Shaping: Getting uniform block shapes can be tricky, especially if you’re doing it manually. To ensure consistent sizes, consider using molds or presses specifically designed for compressed earth blocks.
- Drying Time: Compressed earth blocks need sufficient time to dry and cure before they can be used in construction projects. Weather conditions like high humidity or rain showers may prolong drying time significantly. Patience is key here; allow ample time for thorough drying indoors or under cover.
- Quality Control: Maintaining quality control throughout the process is essential for successful results with compressed earth blocks. Regularly check block dimensions, strength, and durability during production to identify any issues early on and make necessary adjustments.
By addressing these challenges head-on and implementing suitable solutions, you’ll increase your chances of successfully making high-quality compressed earth blocks that are durable and sustainable.
Applications of compressed earth blocks
Compressed earth blocks (CEBs) have gained popularity in the construction industry due to their numerous applications and benefits. Let’s explore some of the key areas where CEBs can be used.
- Sustainable Housing: One of the primary uses of CEBs is for building sustainable houses. These blocks offer excellent thermal insulation properties, reducing the need for additional heating or cooling systems. They are also cost-effective, making them an ideal choice for affordable housing projects.
- Commercial Buildings: CEBs can be utilized in constructing various types of commercial buildings such as offices, schools, healthcare facilities, and retail spaces. Their durability and insulating properties make them suitable for creating comfortable environments while maintaining energy efficiency.
- Disaster-Resistant Structures: In disaster-prone regions, CEBs can play a crucial role in constructing resilient structures that can withstand earthquakes and other natural disasters. Their strength and stability provide enhanced safety to occupants during adverse events.
- Landscape Features: Apart from traditional buildings, CEBs can be employed creatively to construct landscape features like retaining walls, garden borders, benches, or even artistic sculptures – adding a unique touch to outdoor spaces.
- Community Projects: Compressed earth blocks offer an opportunity for community engagement by involving locals in the construction process itself – encouraging skill development and fostering a sense of ownership within the community.
- Government Initiatives: Many governments worldwide promote sustainable construction practices through incentives or regulations advocating the use of eco-friendly materials like CEBs.
The versatility and environmental advantages offered by compressed earth blocks make them suitable for diverse applications across residential, commercial, and public sectors alike.

As we wrap up this guide on how to make compressed earth blocks, it’s important to reflect on the many advantages and possibilities that they offer. These versatile building materials are not only environmentally friendly but also provide exceptional thermal insulation, durability, and cost-effectiveness.
By utilizing locally sourced soil and minimal amounts of cement, you can create sturdy and sustainable structures that blend seamlessly with their natural surroundings. Compressed earth blocks have been used for centuries in various parts of the world, proving their longevity and resilience.
In addition to being an eco-friendly alternative to traditional bricks or concrete blocks, compressed earth blocks also contribute to a healthier indoor environment. Their breathable nature helps regulate moisture levels within buildings, reducing the risk of mold growth and improving air quality.
From small residential projects to large-scale construction endeavors, the applications for compressed earth blocks are endless. Whether you’re building homes, schools, or community centers, these blocks offer an affordable solution that promotes sustainability while maintaining structural integrity.
So why not consider embracing this ancient yet innovative technique? By learning how to make compressed earth blocks yourself or working with experienced professionals in the field, you can join the movement toward more sustainable construction practices. Innovation begins with creativity and a willingness to explore new possibilities. So go ahead – start your journey into the world of compressed earth block construction today.
FAQs on how to make compressed earth blocks
Can I use any type of soil for making compressed earth blocks?
Ideally, you should use soil with high clay content as it provides better binding properties. , other types of soils can be used too, but they may require additional stabilizers like cement or lime.
How long does it take for the compressed earth blocks to dry and cure?
The drying time depends on various factors such as weather conditions and the size of the blocks. Generally, it takes around 7-14 days for them to air dry completely. Curing, on the other hand, takes several weeks or even months for optimal strength.
Are there any specific tools required for making compressed earth blocks?
You will need basic tools such as a shovel or spade for digging and mixing soil, a tamper or block press machine to compress the blocks into shape, and molds or frames to give them their desired dimensions.
What are some common challenges faced when making compressed earth blocks?
One common challenge is finding suitable soil with the right composition in your area. Another challenge is achieving consistent compression throughout each block without voids or weak spots. It may also take some trial and error before getting the right proportion of cement and water in your mixtures.
Can I build load-bearing structures using compressed earth blocks?
Compressed earth blocks have excellent load-bearing capabilities when properly made and cured. They have been used successfully in many construction projects worldwide including residential homes, schools, commercial buildings, and even multi-story structures.
How long do compressed earth block structures last?
When constructed correctly with proper foundations and appropriate design considerations (such as adequate roof overhang), compressed earthen block structures can last several decades if not longer depending on maintenance practices.
Can I add color or decorative elements to my compressed earth blocks?
Yes, you can add color to your compressed earth blocks by adding natural pigments or oxides to your soil mix. You can also incorporate decorative elements like stones, shells, or glass into the blocks before they are compressed for a unique look
