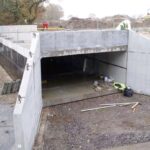
What is a concrete culvert?
A concrete culvert is a type of underground drainage system that is made from concrete. They are used to divert water away from areas that are prone to flooding.
Culverts are usually built underneath major roads, railways, and other important infrastructure. They are typically buried underground and have a culvert pipe that runs through them. The pipe is usually made out of plastic or metal so that it can withstand weather conditions.
Culverts are an important part of the infrastructure and can help to prevent flooding. They are also a cost-effective way to divert water away from areas that are prone to flooding.
Installation procedures
A concrete culvert installation is a job that requires a lot of precision and experience. If you want to install a concrete culvert the right way, make sure to follow these procedures.
The Site Preparation Process
It is important to ensure that the site where the culvert will be installed is properly prepared before beginning any concrete culvert installation procedures. The following are some of the steps that should be taken to help ensure a successful installation:
- Remove any existing vegetation or debris from the area. This will help limit damage to the culvert during installation.
- Level the area with a shovel or trowel. This will help ensure the proper placement of the culvert later on.
- Mark the location of the culvert with flagging or stakes. This will help you visualize where it should be placed during installation.
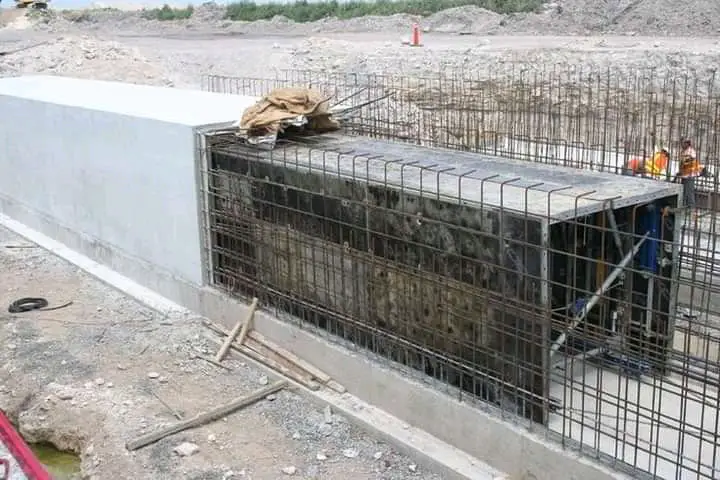
- Excavate a trench at the desired location and place reinforcing steel bars at both ends of the trench. The bars should be at least 3 feet wide and 12 inches deep. Make sure to leave a 2-foot gap between bars at both ends of the trench.
- Place the concrete culvert in the trench, using a crane or heavy equipment if necessary. Make sure to keep the gap between bars open at both ends of the trench while placing the culvert in place. Pour concrete around the perimeter of the culvert until it reaches full height, then close up the gap between bars.
- Drive wooden stakes into the ground at each end of the culvert to help support it.
- Finish the installation by leveling the ground around the culvert and securing the stakes with wire ties or concrete screws.
Digging the Culvert
There are a few things you need to do before digging your culvert. First, determine where the culvert will be installed. It is important to note the following:
- The culvert should be placed below the frost line. This is the line where the ground freezes in winter and thaws in summer. Below the frost line, water can seep into the ground and cause damage to foundations and pipes.
- The culvert should be placed away from trees, power lines, and other structures. The closer the culvert is to these objects, the more likely it is that water will flow into or over them during heavy rains or floods.
- Culverts should not be placed in ditches that are too deep or wide. The water in a ditch can easily fill a culvert and cause it to overflow.
- Culverts should be placed at an angle so that water will flow away from the structure. This will help to prevent flooding.
Once you have determined where the culvert will be installed, you need to mark the location with a flag or rock. Next, dig a trench around the culvert. The trench should be at least twice as deep as the height of the culvert. Make sure to fill in the trench with soil and rocks so that there is no sign that the culvert has been dug.
The Installation Process
When it comes to installing concrete culverts, there are a few key steps that must be followed in order to ensure a safe and successful installation. In this blog post, we will outline the general installation process for concrete culverts, starting with the procurement of the correct materials.
- Plan your culvert installation: The first step in installing a concrete culvert is to plan out the installation layout. This will help ensure that the culvert is properly installed and configured to meet your specific needs.
- Purchase the materials: Once you have determined the layout of your culvert, it is time to purchase the materials necessary for its installation. This includes the concrete culvert itself, as well as any necessary hardware and reinforcements.
- Install the concrete culvert: Once all of the materials have been purchased and assembled, it is time to install the concrete culvert. This can be a challenging task, but with careful planning and execution, it can be done successfully.
- Inspect and maintenance: Once the concrete culvert has been installed, it is important to regularly inspect and maintain it in order to ensure its long-term viability. This includes checking for cracks, corrosion, and other signs of wear and tear.
If you are interested in installing a concrete culvert in your own backyard, be sure to contact a professional contractor like Hanson Concrete Culverts. Our team of experienced professionals is prepared to help you plan and install yourculvert in a safe and timely manner.
The benefits of using a concrete culvert
A concrete culvert is an excellent way to improve your drainage system and protect your property. Here are some of the benefits of using a concrete culvert:
- A concrete culvert is sturdy and can last for many years.
- It is easy to install and maintain.
- It can reduce water damage and flooding.
- It is suitable for a variety of soil types.
- It is a cost-effective solution.
- It can be used in both urban and rural areas.
If you are interested in using a concrete culvert to improve your drainage system, contact a professional contractor.
The Aftermath of an Installation
After a culvert installation is complete, it is important to take care of the concrete and ensure that it is properly sealed. Here are a few tips to follow after the installation:
- Apply a coat of sealant to the top surface of the concrete culvert. This will help to keep moisture and debris from damaging the surface of the culvert.
- Make sure that all debris has been removed from around the culvert. This includes leaves, branches, and other objects that might fall into or onto the culvert.
- Apply a layer of sealant to any joints in the concrete culvert. Joints can easily become exposed due to high water flows or ice formation and can cause damage over time. Sealants will help to protect the joint from moisture and weathering.
- Apply a layer of sealant around each individual drain pipe. This will help to prevent water from seeping down into the pipe and causing damage.
- Leave the sealant in place for at least 24 hours before cleaning the culvert. This will help to ensure that the sealant is effective and does not damage the concrete.
- Always use proper safety gear when working around concrete culverts. This includes protective clothing and tools that are appropriate for the job.
- Report any issues with the culvert installation to your local municipality or contractor. This will help to ensure that the installation is properly maintained and any issues are identified and resolved as quickly as possible.
Conclusion
Thank you for reading our article on concrete culvert installation procedures! In it, we provide a step-by-step guide to installing a culvert in your backyard. Be sure to read the entire article before beginning so that you understand all of the necessary steps and precautions involved in completing this project. If you have any questions or would like help with this project, be sure to contact one of our experts today!
FAQs on concrete culvert
What are the different types of concrete culverts?
There are three types of concrete culverts: the box culvert, the V-box culvert, and the arch culvert. Each type has its own specific installation procedures.
Box culverts are the most common type and are typically used to convey water or sewage runoff. They are made out of a series of rectangular boxes joined together by a series of vertical support beams. To install a box culvert, first, remove the vegetation that is blocking the flow of water or sewage, then dig a trench large enough to fit the desired length of the culvert and position the boxes along the trench. Next, attach the horizontal supports to the boxes and to each other using bolts and washers. Finally, fill in the trench with soil and tamp it down firmly.
V-box culverts are similar to box culverts but have an extra set of vertical support beams at one end. They are used to divert water from one stream into another. To install a V-box culvert, first remove any obstructions that might be in the way of the water flow (e.g., rocks, branches). Then, position the V-boxes along the streamline and attach them to each other using bolts and washers. Finally, fill in the trench with soil and tamp down firmly.
How do you install a concrete culvert?
If you are looking to install a concrete culvert, there are several different procedures that you can follow. Each has its own benefits and drawbacks, so it is important to choose the one that is best suited for your specific situation. Here are four methods that you can use to install a concrete culvert:
Dig the Culvert Hole: If you want to install a culvert using the digger-and-cord method, the first step is to dig the hole. This method is best for small or shallow culverts. You will need a shovel, trowel, and bucket to dig the hole. Make sure that you orient the hole so that the water flows away from the house and toward the road.
Use a Cement Mixer to Assemble the Culver: If you want to install a culvert using the cement mixer-and-cord method, the first step is to assemble the cement mixer. You will need a bucket, mixer, trowel, and shovel to complete this task. Next, connect the mixer hose to the spout on the cement mixer and place it in the trench. Turn on the mixer and wait until it starts working. Then use the trowel to spread the cement mixture around the circumference of the hole. Finally, use the shovel to fill in the cement.
Use a Concrete Culvert Kit: If you want to install a concrete culvert using the pre-assembled culvert kit, the first step is to assemble the kit. You will need a bucket, auger, drill/driver, trowel, and shovel to complete this task. Next, pour the concrete mixture into the trench and use the trowel to spread it evenly around the circumference of the hole. Finally, use the shovel to fill in the concrete.
Use a Tunnel Machine to Assemble the Culvert: If you want to install a concrete culvert using the tunnel machine method, the first step is to assemble the machine. You will need a bucket, auger, drill/driver, trowel, and shovel to complete this task. Next, place one end of the tunnel tube on top of the hole that you have dug and attach it to the machine with clamps or bolts. Then use the drill/driver to start drilling through both tubes into the ground.
After you have drilled a few inches deep, start pouring concrete into each end of the tunnel tube. When the concrete has reached the desired depth, use the trowel to spread it evenly around the circumference of the hole. Finally, use the shovel to fill in the concrete.
Are culverts expensive?
A culvert can be a great investment for your property. Culverts are often very cost effective and can provide many benefits. They can help reduce flooding, keep water away from homes, and improve drainage. They’re also an easy way to add extra storage space and privacy to your property. If you’re wondering whether culverts are expensive, don’t worry. There are many cost-effective options available.
What sizes do concrete culverts come in?
Concrete culverts come in a variety of sizes to fit the needs of your project. We have culverts that are small enough for a single driveway, and we also have larger culverts that can accommodate multiple driveways and roads. We can help you choose the right size for your project so you can avoid any potential problems down the road.
