Attaching stair stringers to deck is an important part of the process when building stairs or ramps. Stair stringers provide support for each step and are composed of horizontal boards that fit together to form a rigid frame. When attaching the stair stringers to your deck, it is important to ensure they are secure and stable. This will help prevent any potential accidents or injuries when using the stairs or ramp. In this article, we will discuss the proper techniques and materials needed to securely attach stair stringers to your deck. We will also provide tips on how to make sure your stairs or ramp remain safe and sturdy for years of use.
We’ll also provide you with a step-by-step guide on attaching stair stringers to deck. We’ll share some valuable tips and tricks along the way to ensure a successful installation. So grab your tools and let’s get started on transforming your deck into a beautiful and functional outdoor oasis.
Tools and Materials Needed for attaching stair stringers to deck
When it comes to attaching stair stringers to your deck, having the right tools and materials is essential for a successful installation. Here are some of the key items you’ll need:
- Measuring tape: Accurate measurements are crucial when cutting your stringers to ensure they fit securely.
- Circular saw: This tool will be used to cut the stringers at the correct angles and lengths.
- Drill/driver: You’ll need this for pre-drilling holes and attaching screws or bolts.
- Level: Ensuring that your stairs are level is important for safety and stability.
- Carpenter’s square: This tool will help you mark precise cuts on your stringers.
- Safety gear: Don’t forget your safety glasses, gloves, and ear protection while working with power tools.
In addition to these tools, you’ll also need a few materials such as pressure-treated lumber for the stringers, galvanized screws or bolts for securing them, and brackets or hangers designed specifically for attaching stair stringers to decks. Having all these tools and materials ready before starting will make the process much smoother and ensure a sturdy set of stairs that can withstand regular use over time.
Step 1: Preparing the Ledger Board
Before you can start attaching stair stringers to deck, it’s important to properly prepare the ledger board. This is the horizontal piece of lumber that is attached to the house and supports one end of the stairs.
To begin, make sure you have all the necessary tools and materials on hand. You’ll need a circular saw, measuring tape, level, drill with appropriate bits, lag screws or bolts for securing the ledger board, and pressure-treated lumber for constructing the stringers.
Next, carefully measure and mark where the ledger board will be positioned on your deck. It should be placed below any doors or windows and at least 1 inch below any siding or trim.
Once you’ve determined its placement, use a level to ensure that it’s perfectly straight. Then pre-drill holes into both ends of the ledger board before attaching it securely using lag screws or bolts.
Taking these preliminary steps will help ensure a sturdy foundation for your staircase installation. With the ledger board in place, you can now move on to cutting and attaching your stair stringers in Step 2.
Remember to always exercise caution when working with power tools and follow manufacturer instructions for proper usage. Safety should always be a top priority when undertaking any DIY project.
Step 2: Cut the Stringers
Now that you have prepared the ledger board, it’s time to move on to cutting the stringers for your deck stairs. This step is crucial as it determines the stability and safety of your staircase.
To begin, measure the height from the top of the decking surface to where you want your stairs to end. This will be your total rise measurement. Next, determine how many steps you want by dividing the total rise by a comfortable riser height (usually around 7 inches).
Using these measurements, mark out each individual step on a piece of lumber that will serve as your stringer material. Make sure to account for any tread overhang or nosing when marking out each step.
Once marked, carefully cut along these lines using a circular saw or handsaw. Take your time and make precise cuts to ensure accuracy and consistency among all the stringers.
Remember, safety should always be a priority when working with power tools. Wear protective gear such as goggles and gloves, and take proper precautions while handling sharp objects.
With this important step complete, you are now ready to move on to attaching the stringers securely in place on your deck framework.
Step 3: Attach the Stringers
Now that you have your stringers cut and ready, it’s time to attach them to your deck. This step is crucial for the stability and safety of your staircase, so make sure to pay close attention.
Start by positioning the stringers against the ledger board and aligning them with the layout lines you marked earlier. Use a level to ensure they are plumb, both vertically and horizontally. This will prevent any wobbling or unevenness in your stairs.
Next, secure the stringers to the ledger board using galvanized screws or nails. Make sure to space them evenly along each stringer for maximum support. It’s important not to overtighten these fasteners as it can cause damage to both the stringers and the ledger board.
Once the stringers are securely attached, double-check their alignment one more time before moving on to further installation steps. If necessary, make any adjustments now before proceeding.
Remember, attaching stair stringers properly is essential for a sturdy and durable staircase. Take your time during this step and don’t rush through it – precision is key!
In our next section, we’ll discuss how to install treads and risers onto your newly attached stair stringers. Stay tuned.
Step 4: Install the Treads and Risers
Now that the stringers are securely attached to your deck, it’s time to move on to installing the treads and risers. This step is crucial for ensuring a safe and functional staircase.
First, measure the width of your stairway and cut each tread accordingly. Make sure they fit snugly between the stringers. Next, attach each tread using screws or nails, making sure they are evenly spaced apart.
Once all the treads are installed, it’s time to add the risers. Measure from one tread to another and cut each riser accordingly. Attach them in place using screws or nails as well.
When installing both treads and risers, make sure they are level with each other for a smooth walking surface. Use a level tool to ensure accuracy.
Remember that safety should be your top priority when installing stairs. Always double-check your measurements and take extra care when attaching treads and risers.
With this step complete, you’re one step closer (pun intended!) to having a fully functioning staircase attached to your deck! Keep reading for our final step – attaching the stringers to the deck itself.
Step 5: Attach the Stringers to the Deck
Now that you have prepared your stringers and installed the treads and risers, it’s time to attach the stringers to the deck. This step is crucial for ensuring a secure and stable staircase.
To begin, position each stringer against the side of the deck where you want your stairs to be located. Use a level to ensure they are plumb, or vertically straight. Once they are in position, mark where each stringer meets the deck.
Next, you will need to attach metal brackets or angle brackets to secure the stringers in place. These brackets will provide additional support and help prevent any wobbling or movement of the stairs over time.
Using screws or nails specifically designed for outdoor use, fasten these brackets securely into both sides of each stringer at every point where they meet with the deck. Be sure to follow any manufacturer instructions regarding the spacing and placement of these fasteners.
Once all brackets are securely attached, double-check that everything is aligned correctly and tighten any loose connections if necessary. Your stair stringers should now be firmly attached to your deck structure.
Remember, proper attachment is vital for safety reasons – no one wants wobbly stairs! By following this step-by-step process carefully and using quality materials, you can enjoy sturdy and dependable stairs that complement your deck perfectly.
Tips for a Successful Installation
- Measure Twice, Cut Once: Before you even begin attaching the stair stringers to your deck, make sure to carefully measure and double-check all dimensions. Taking accurate measurements will help ensure that your stringers fit properly and that your stairs are safe and sturdy.
- Use Quality Materials: When it comes to attaching stair stringers to a deck, using high-quality materials is essential for long-lasting results. Invest in pressure-treated lumber or other suitable materials that can withstand outdoor conditions and resist rotting or warping over time.
- Follow Building Codes: It’s crucial to familiarize yourself with local building codes before starting any construction project, including installing stairs on your deck. These codes dictate specific requirements for things like riser height, tread depth, handrail placement, and more. Adhering to these regulations will not only ensure the safety of your stairs but also prevent potential legal issues down the line.
- Secure Stringers Properly: Take care when attaching the stringers to both the ledger board (attached to the house) and the deck joists themselves. Use strong structural screws or bolts designed for this purpose rather than relying solely on nails or regular wood screws.
- Consider Adding Bracing: To enhance stability further, consider adding additional bracing between each step of the stair stringers as well as diagonal bracing near their base if necessary.
Use a Level During Installation: Throughout each step of installation – from cutting and positioning the stringers to fastening them securely – use a level regularly to ensure that everything remains plumb and level. Remember that these tips are meant as general guidelines; always consult professional advice if you feel unsure about any aspect of attaching stair stringers to your deck.
As we wrap up this guide on attaching stair stringers to the deck, it’s important to remember that proper installation is key to ensuring a safe and sturdy staircase. By following the steps outlined in this article and using the necessary tools and materials, you’ll be well-equipped for success.
Remember, preparation is crucial. Take your time to carefully measure and cut the stringers, ensuring they are level and securely attached to both the ledger board and deck surface. Installing treads and risers will provide an added layer of stability, making your stairs not only functional but visually appealing as well.
Throughout the process, keep safety in mind. Double-check all connections and make adjustments as needed. Consider consulting a professional if you have any doubts or concerns about your ability to complete the project safely.
With these guidelines in mind, you’re ready to tackle attaching stair stringers to your deck with confidence! Enjoy your newly enhanced outdoor space while providing a convenient access point for family and friends alike.
FAQs on attaching stair stringers to deck
Can I attach stair stringers directly to the deck surface?
No, it is not recommended to attach stair stringers directly to the deck surface. This can compromise the integrity of your deck and pose safety risks. It is important to properly secure them to a ledger board or support posts.
How many stringers do I need for my stairs?
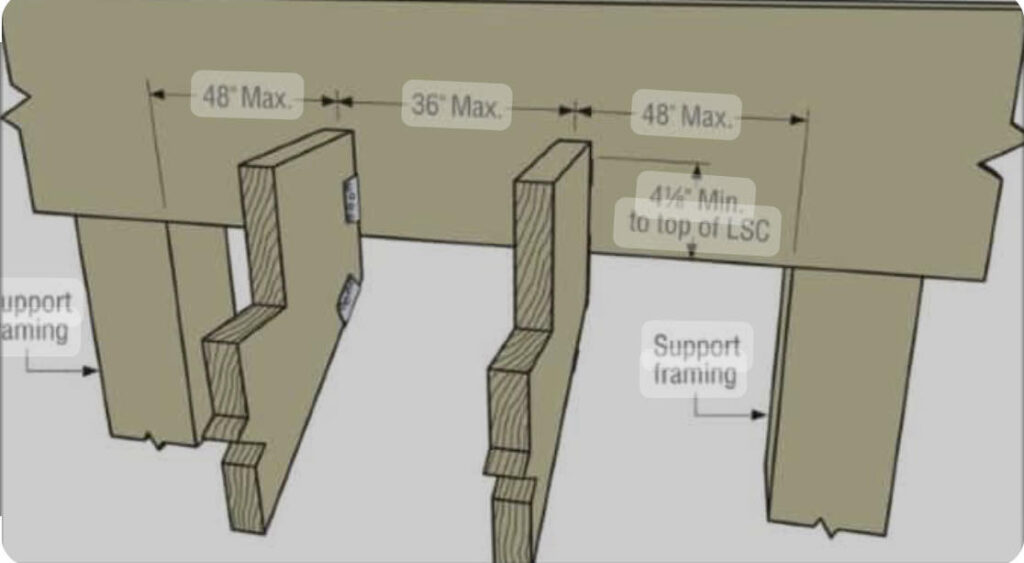
The number of stringers you need will depend on the width and height of your stairs, as well as local building codes. As a general guideline, you should have at least three stringers for stairs that are up to 36 inches wide.
What type of wood should I use for my stair stringers?
Pressure-treated lumber is commonly used for outdoor applications like decks and stairs due to its resistance against rot and decay. Make sure the wood meets code requirements in your area.
Should I use nails or screws when attaching stair stringers?
It is recommended to use structural screws or galvanized lag bolts instead of nails when attaching stair stringers. Screws provide better long-term stability and durability compared to nails.
Do I need riser boards for my deck stairs?
Riser boards are not always necessary for deck stairs but they can add aesthetic appeal and improve safety by preventing tripping hazards between steps.
How far apart should I space my treads on the staircase?
Building codes typically require a minimum tread depth of 10 inches, with consistent spacing between each tread along the entire staircase.
Can I build curved or spiral stairs using this method?
While this article focuses on traditional straight-run staircases, there are specialized techniques available if you want to build curved or spiral stairs using different materials such as metal brackets designed specifically for those purposes.
Remember that every project may have specific requirements based on local building codes, so it’s essential to consult with professionals or check regulations applicable to your area. By following the steps outlined in this article and adhering to safety guidelines, you can confidently and safely attach stair stringers to your deck.
